I have recently resumed, after decades of the table being propped against a wall, using a very old table-top Russian Billiards table. It was always referred to as a 'Russian Billiards' table rather than a 'Bar Billiards' table.
I don't know exactly how old it is, as there is no date or maker's mark on it that I can see; I remember playing on it in the 60s when the family lived in Leicester so it is at least 50-something years old!
I have looked online but have not come across anything remotely similar apart from in a thread on the British Bar Billiards forum (barbilliards.proboards.com) which mentions, rather disparagingly, sightings on ebay and Youtube of various-sized table-top tables in 2007 and 2011.
There are videos on YouTube of people playing Bar Billiards:
The baize area of the table is 4ft x 2 ft, it has the full complement of 9 holes (10, 20x2, 30x2, 50x2, 100, 200), arranged in the usual positions. The wood surround is 52 inches x 28 inches. The score values of the holes are marked in gold on the top of the wood surround, and on the top edge of the back of the chute tray. The chute tray slides in so it is below the edge of the surround when not in use. There is no timer mechanism, there has never been one. The bed appears to be wood, rather than slate, and is slightly warped in places.
The table is not in pristine condition but it is good enough for our current level of skill, and we enjoy playing. The baize is slightly 'moth-eaten' in places, but not enough to spoil the play. The rubber in the cushions has gone hard over time, and there is very little give.
The leather(?) covering at the baulk end is triangular rather than rectangular.
If there was a D marked on the baize at the start position, it must have faded. Ditto the baulk line.
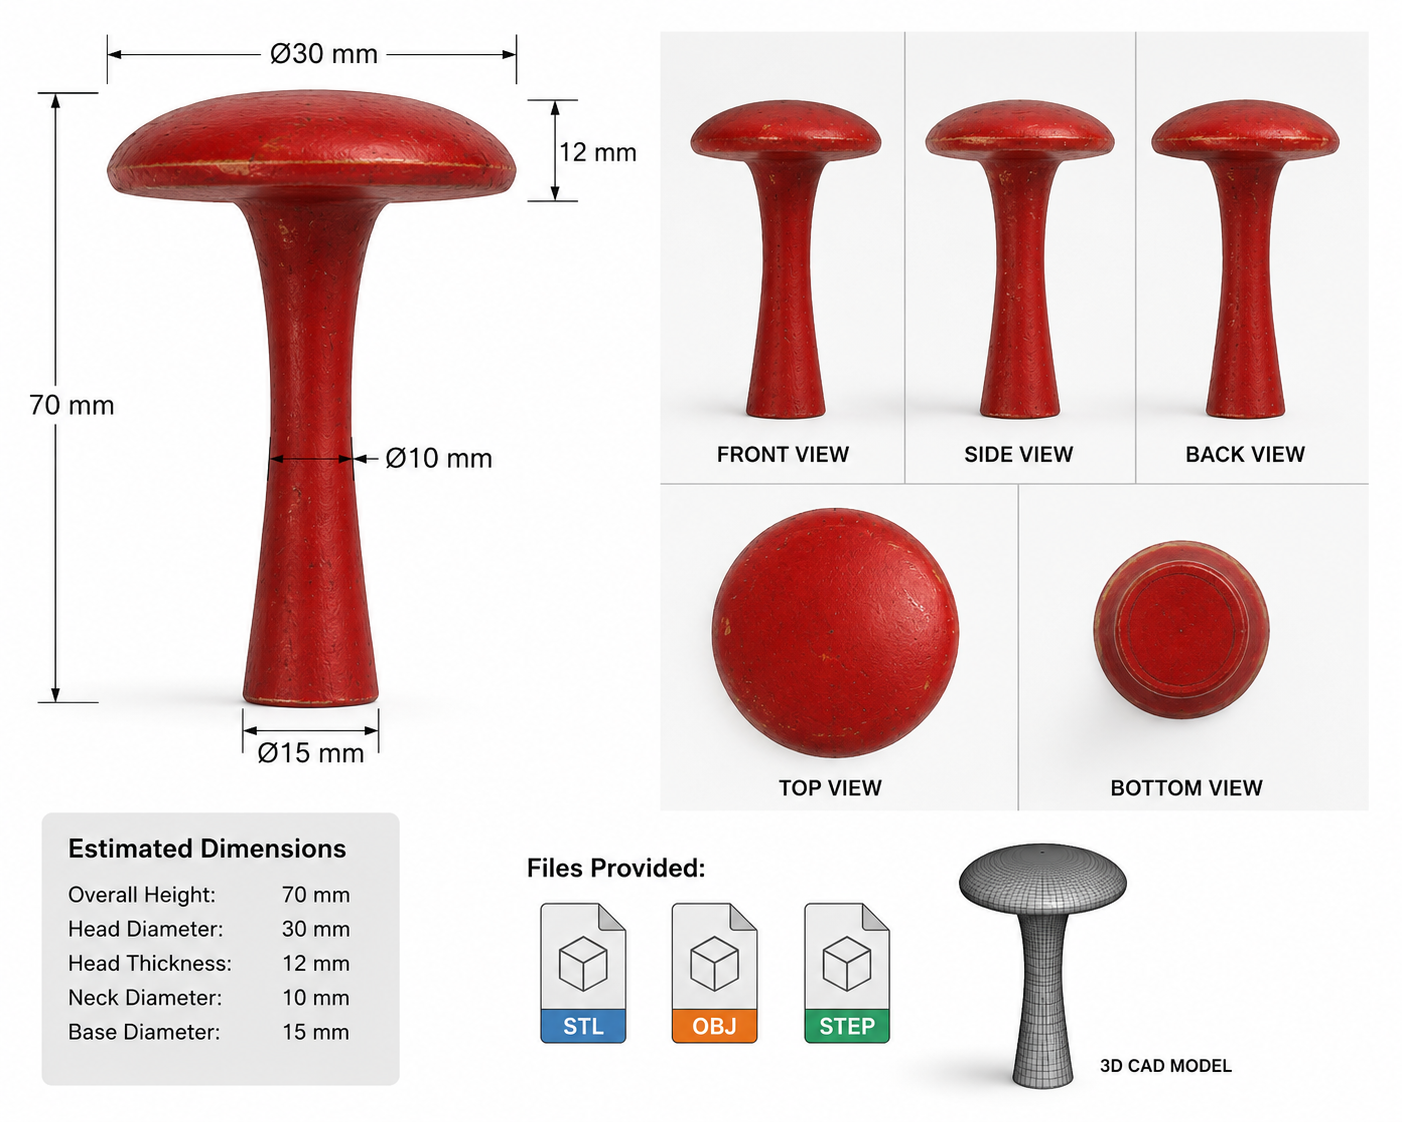
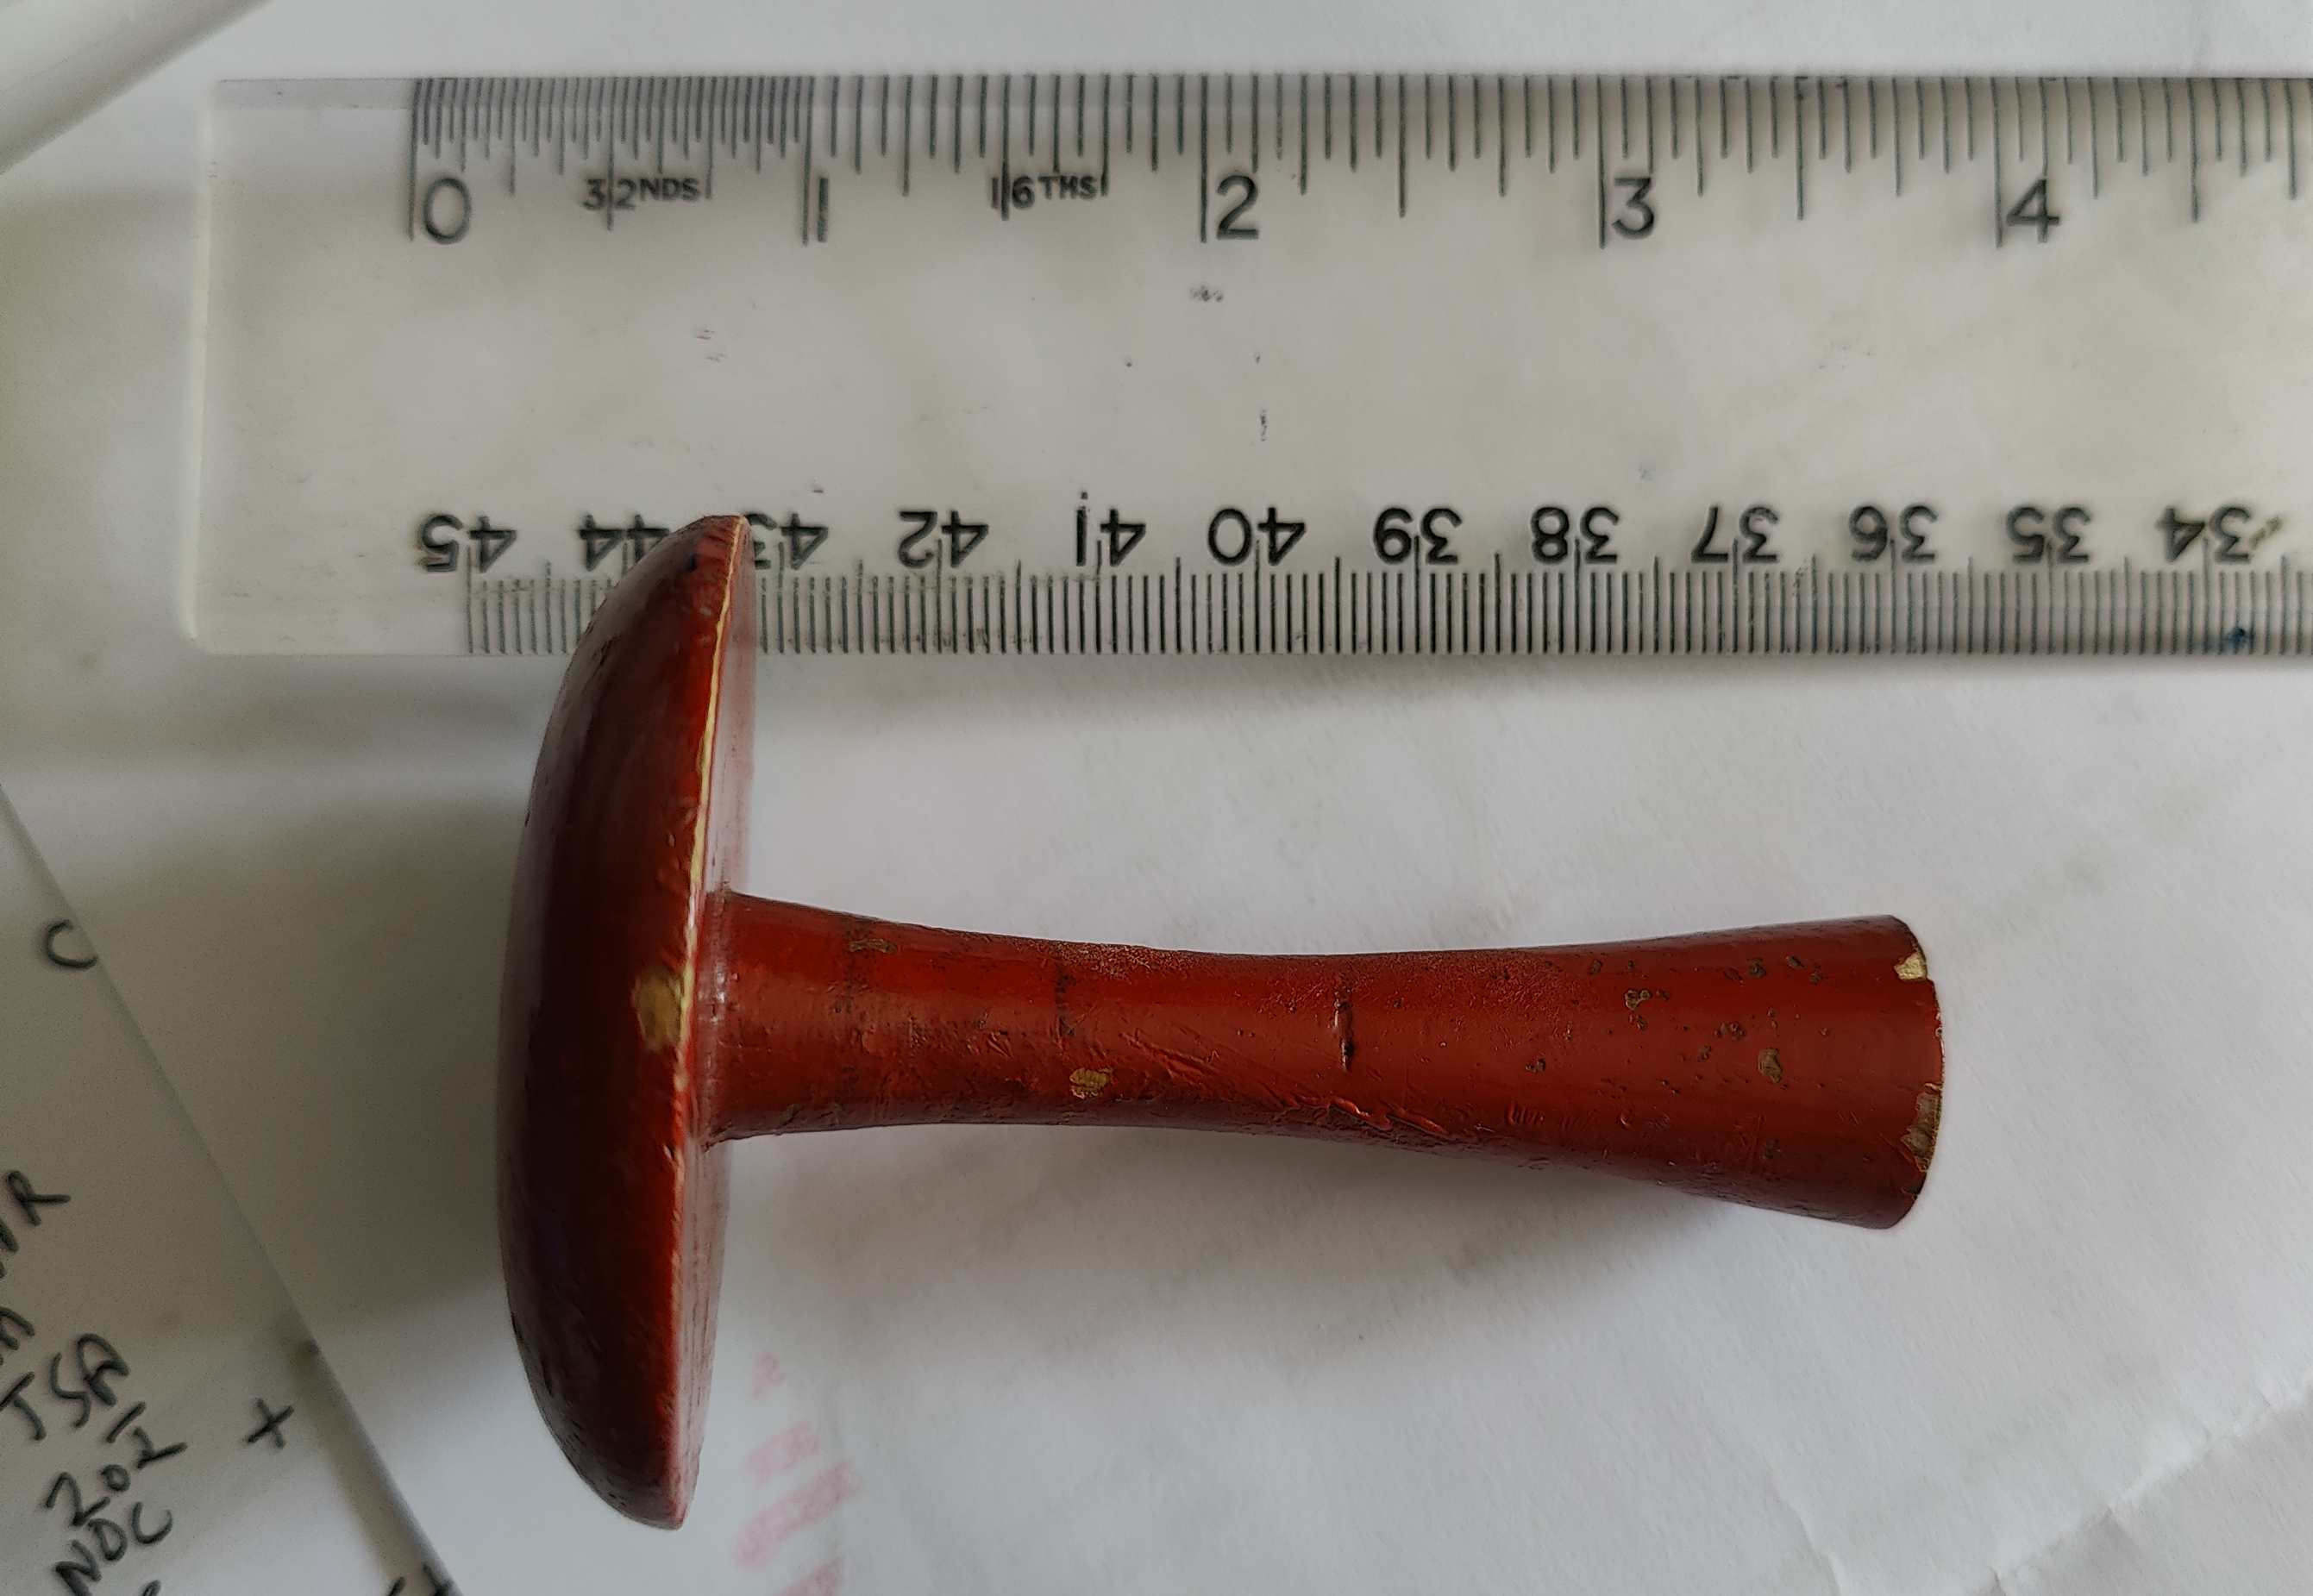
There are 3 red wooden mushrooms, 3 inches tall, which are usually placed in front of the 50 and 200 holes, although faint chalk crosses on the baize near the 100 hole suggest that mushrooms may have been placed on either side of that hole at times. Knocking over the mushroom near the 200 hole loses your whole score, not just the current break!
In some variants of the game, the mushrooms are narrow pegs with a narrow metal bar through them; these are referred to as 'pins' or 'skittles' and can be seen in some of the videos linked above. The mushrooms/pins can be coloured differently to distinguish their different effect on the player.
The mushrooms/pins can be placed in various arrangements, depending on the rules that are in force:
NB Click on images to see larger version.
|
Full view from top end of the table: 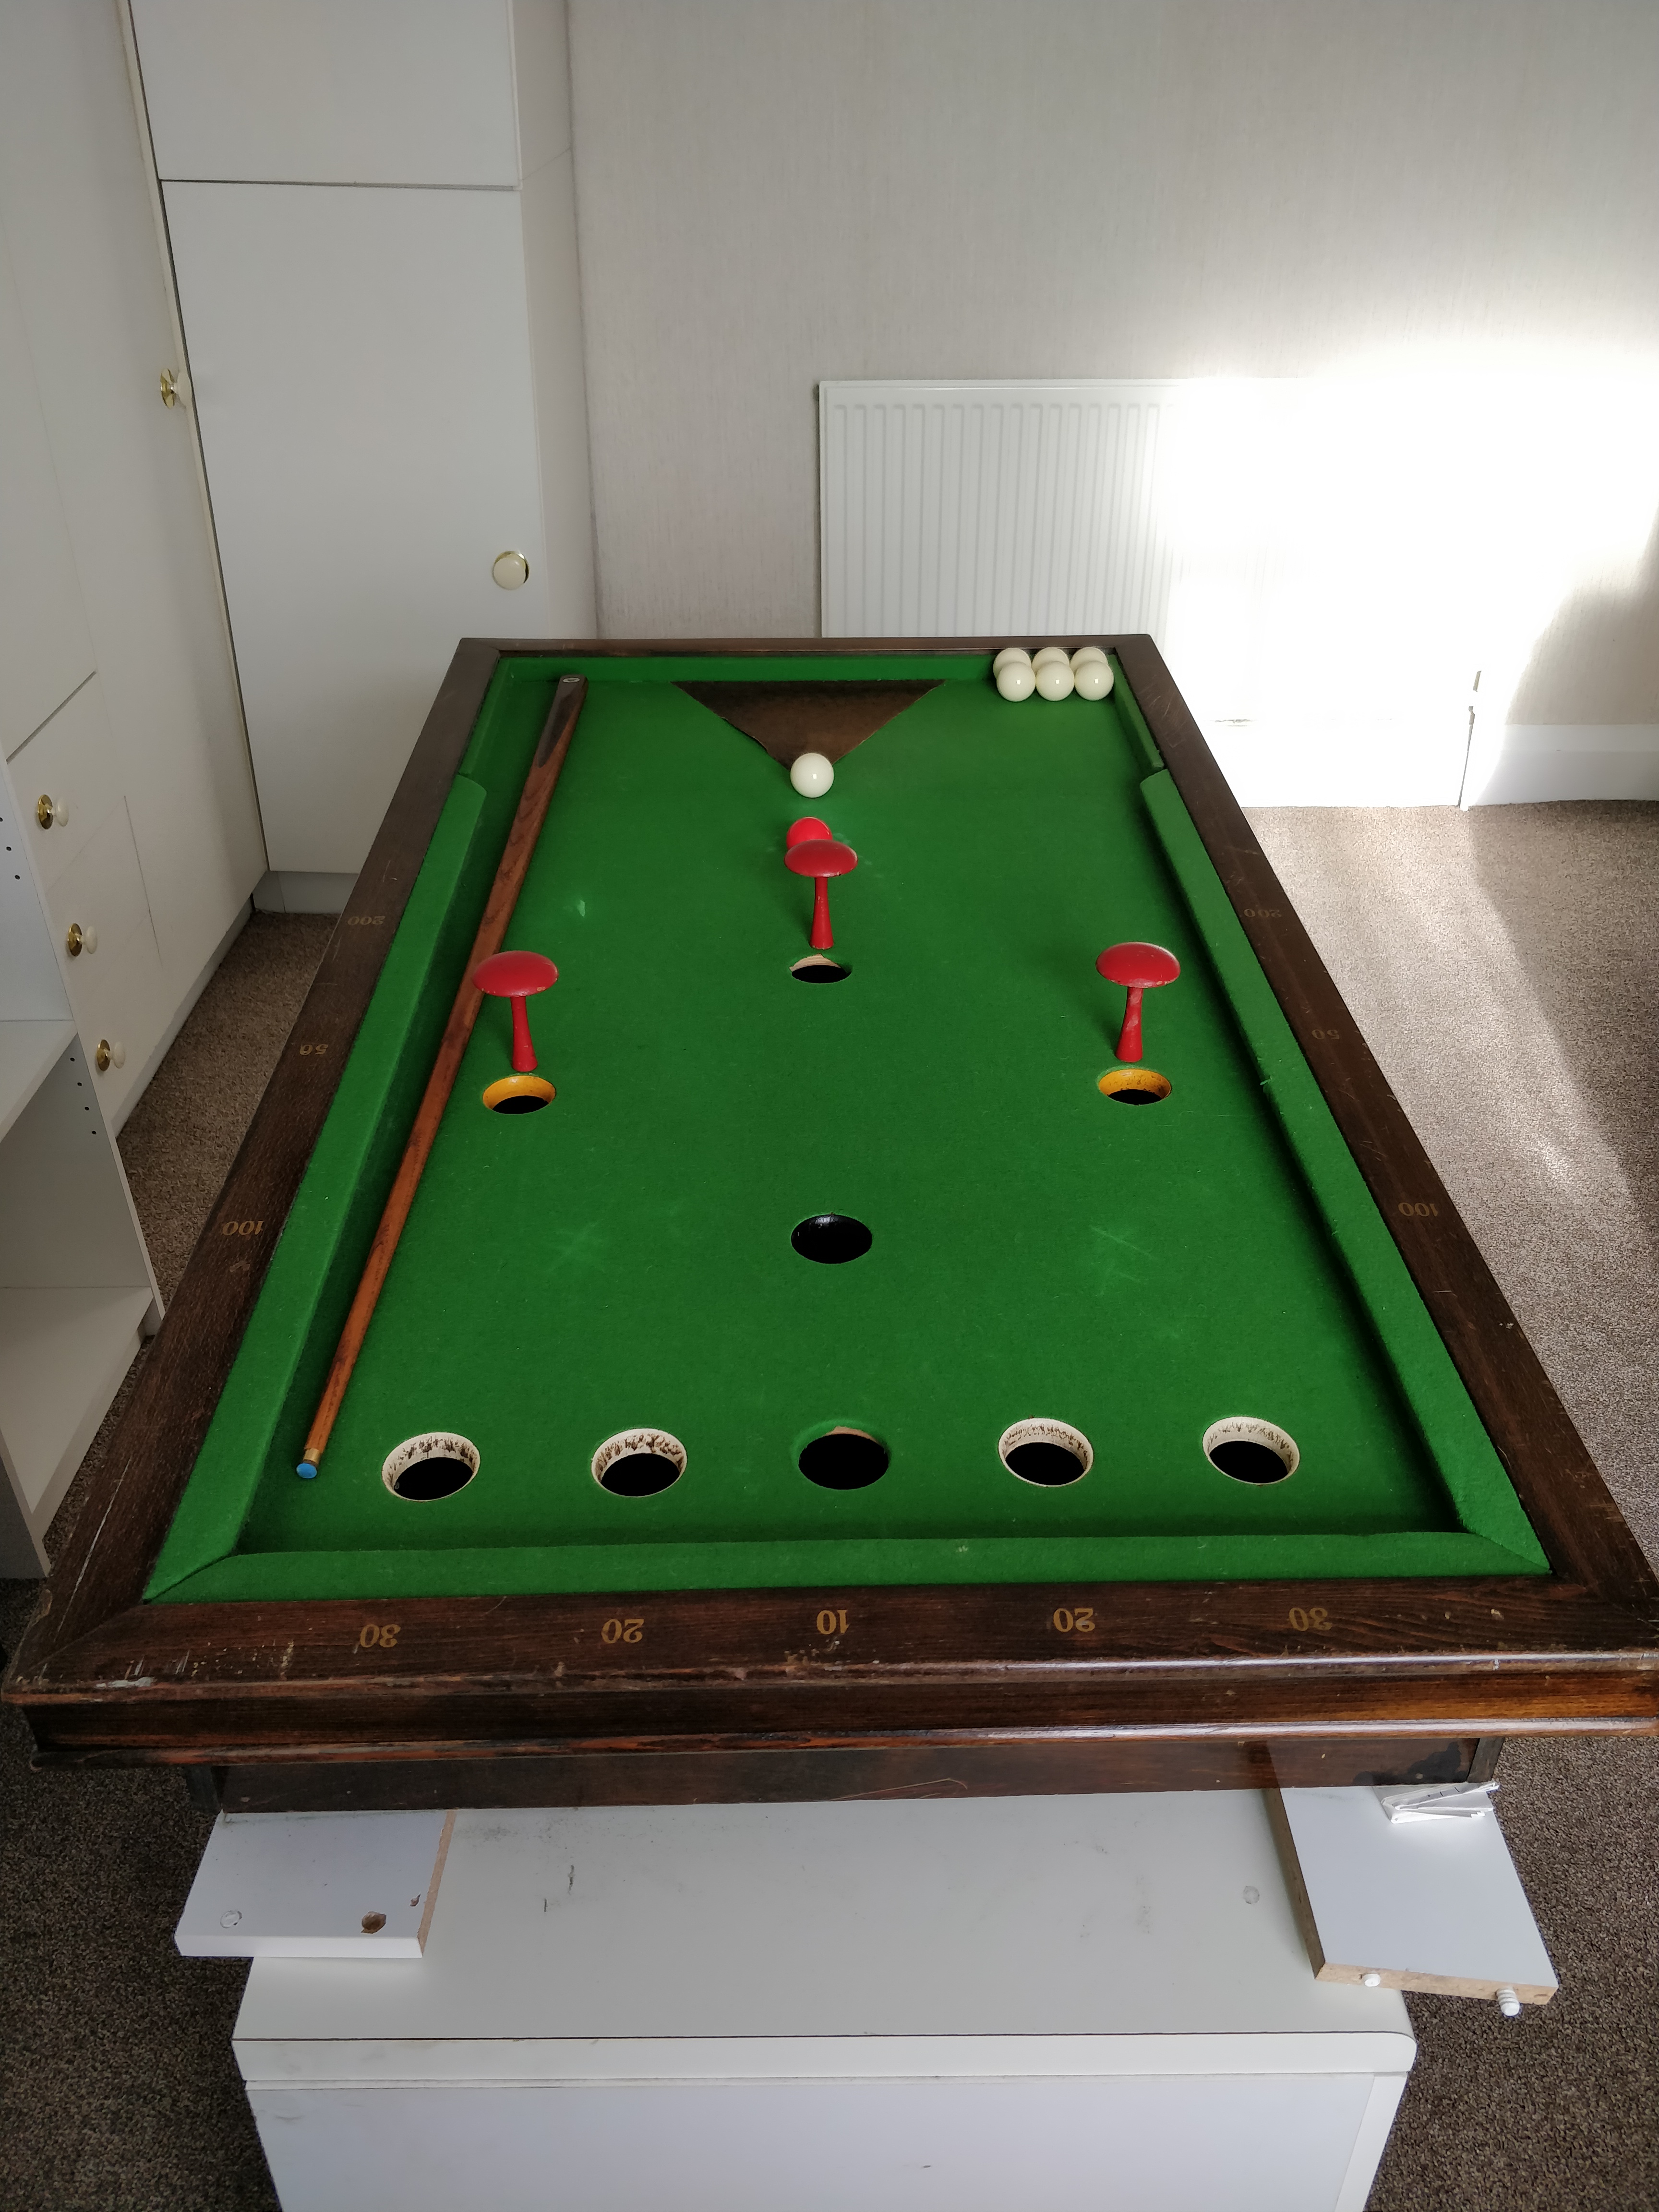
The cue is a recently-purchased 42 inch Peradon Merit; the old cues we had were either not quite straight or had no tip. |
Full view from baulk end of the table: 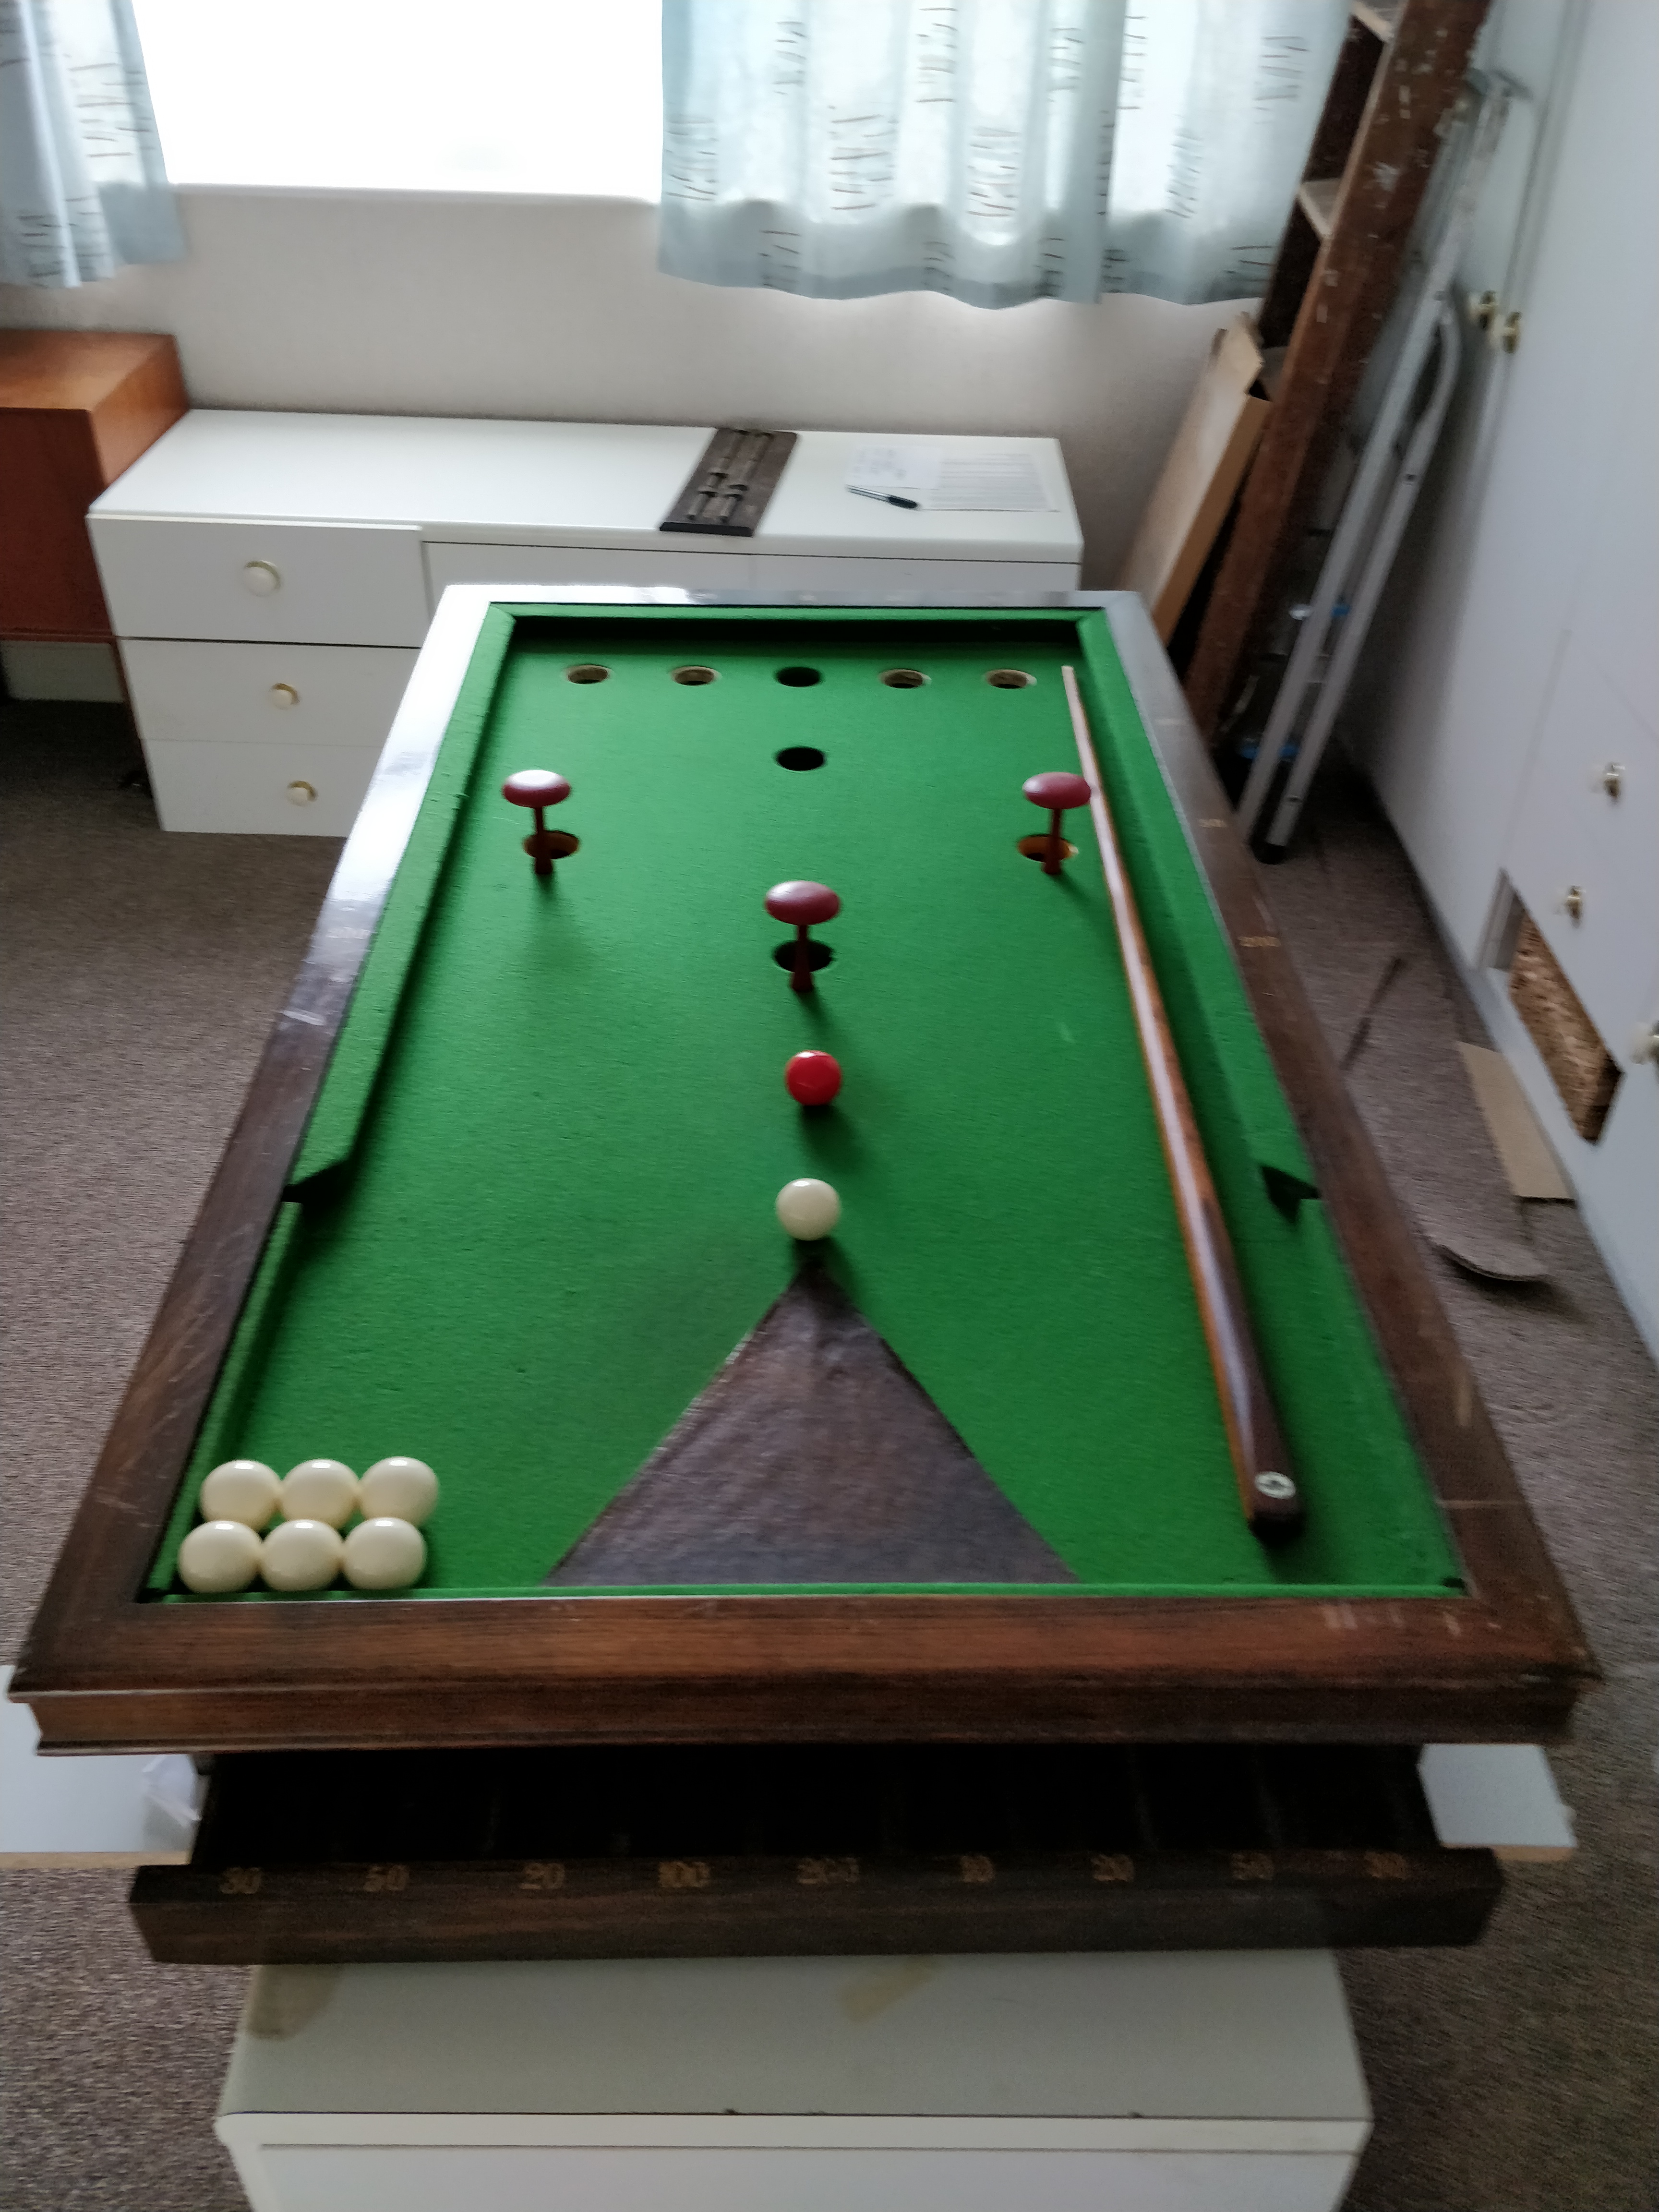
|
|
Top end of the table: 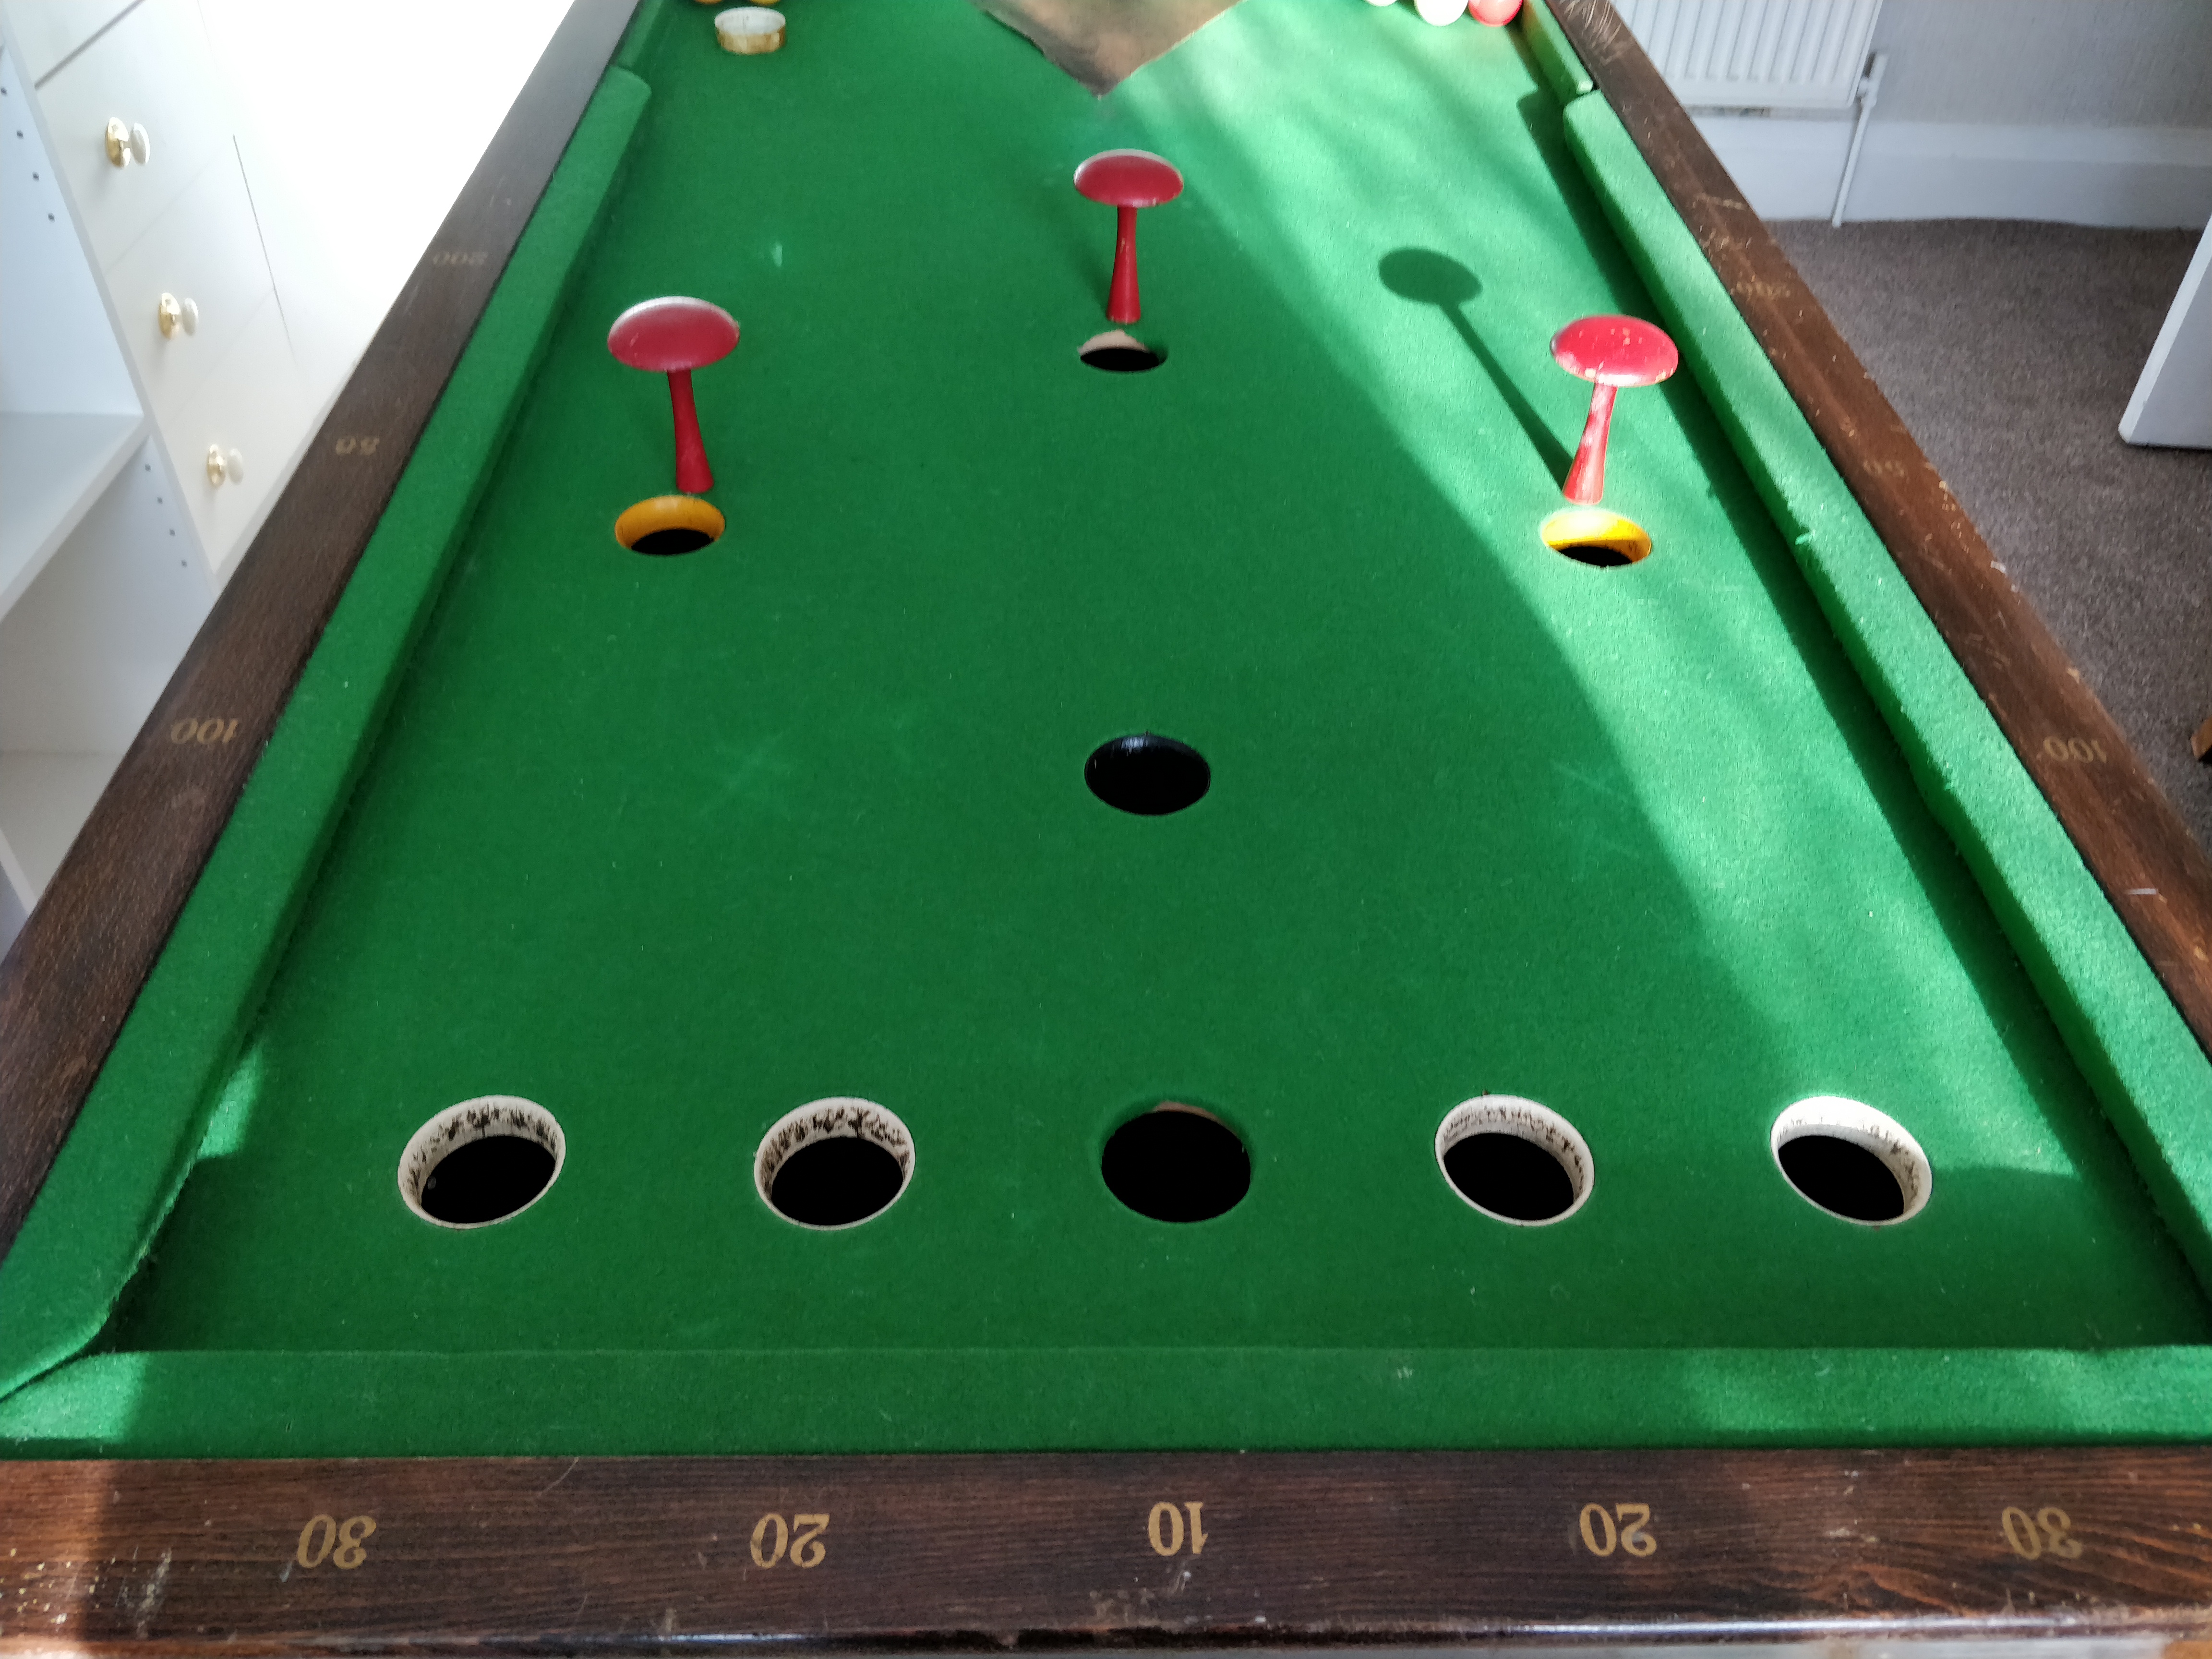
NB The 10 and 200 holes do not currently have rings - see text below for the explanation. |
Baulk end of the table: 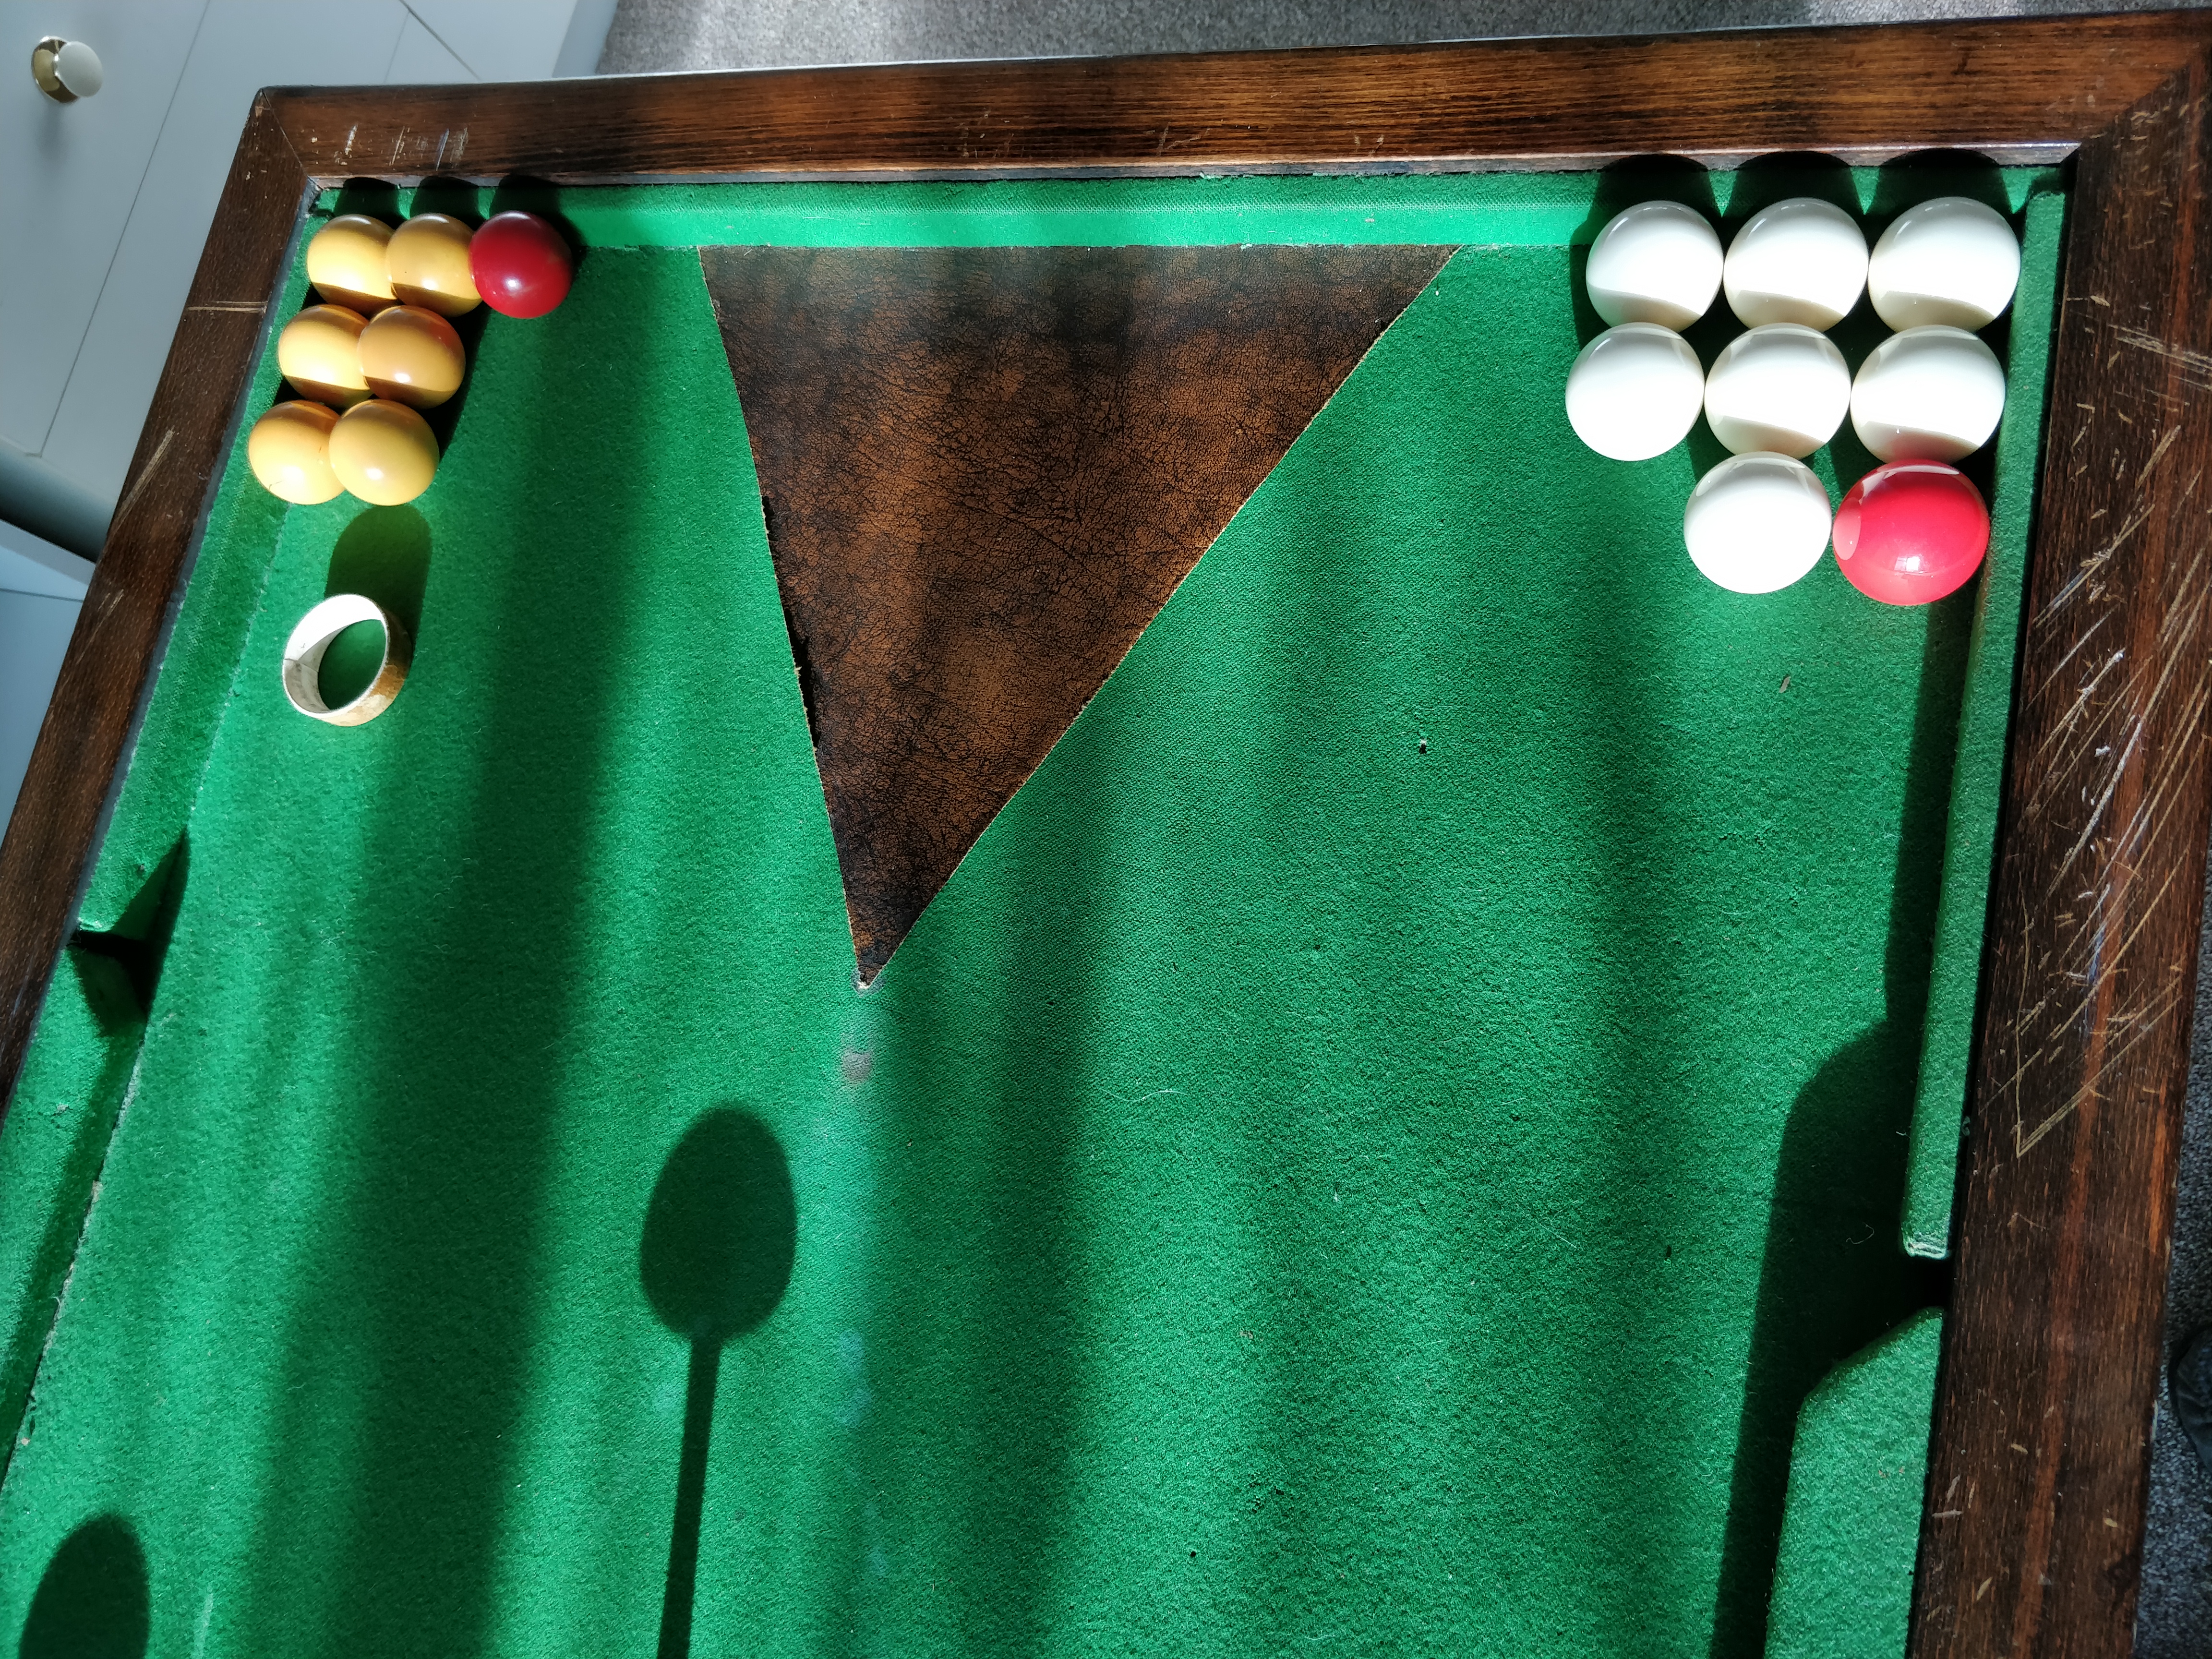
With the old (once white but now yellow, with one missing) and new (white) ball sets. NB The lack of a D, and a baulk line. |
|
Side view of the table: 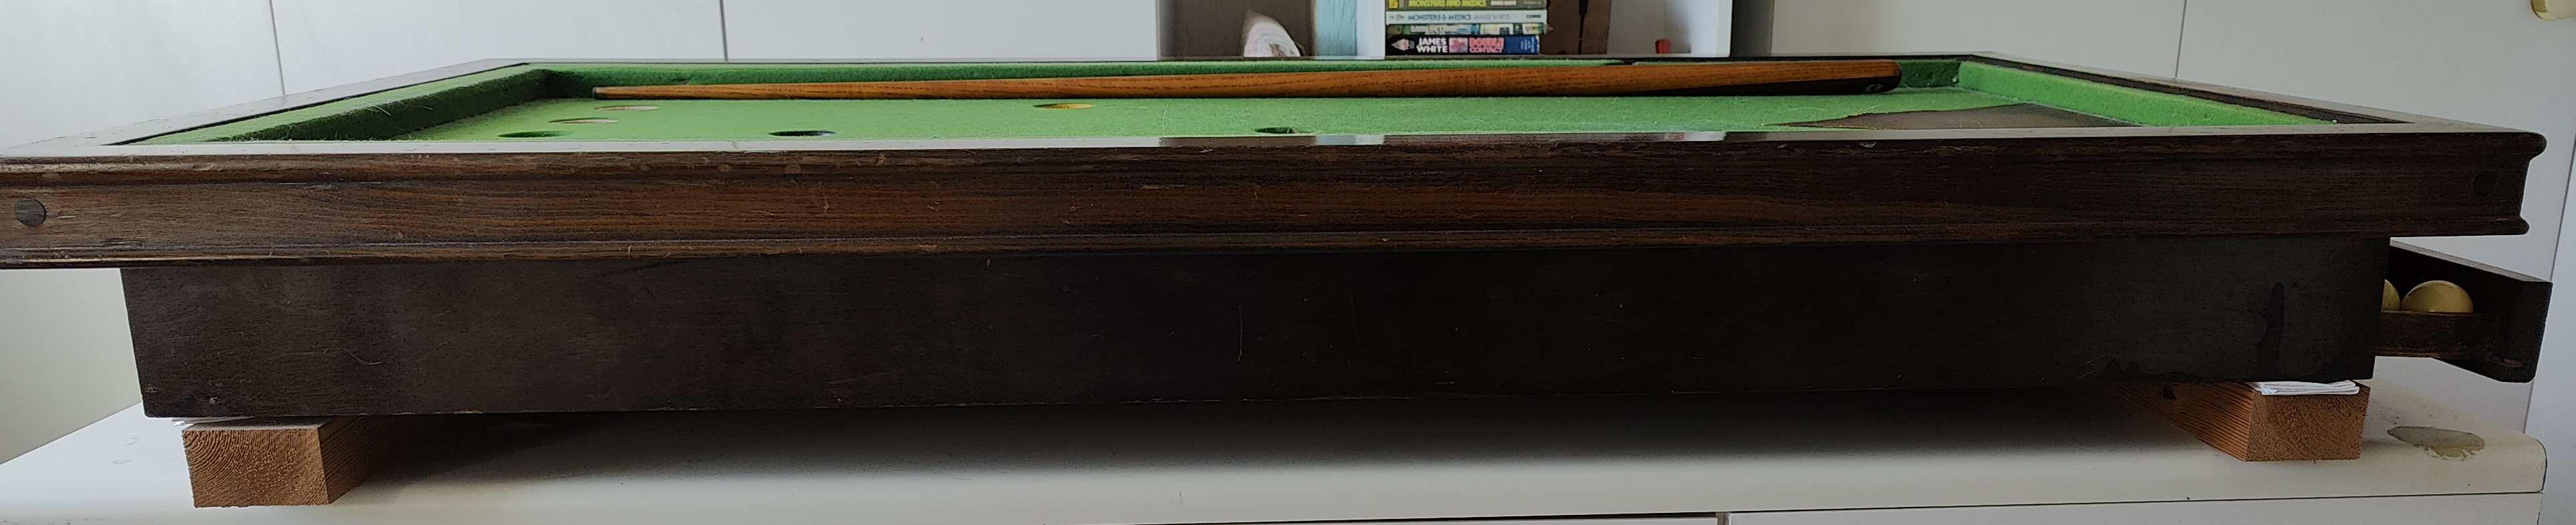
|
|
|
Scoreboard: 
|
The pockets have painted wooden rings, which are of different colours: white (10, 20, 30), yellow (50), black (100) and red (200). The glue on the rings has solidified over the years and they have become loose; I have re-glued most of the ones we have. One of the white rings broke into pieces and has been taped back together, but the hole is now slightly too small for the ball to pass through freely so we have to play without it. The red ring is completely missing.
In some variations (as in the 2 videos linked above), the rings are all the same colour, usually unpainted wood.
I have been looking to find replacement rings for the re-assembled white and missing red but without success. I have found many sites online selling a set of red plastic(?) rings made by Perador but I don't think they will fit my table, as they are described as "Inner diameter of 55mm - Outer diameter of 66mm"; the rings I have have an outer diameter of c 47.5 mm at the top, 45 mm at the bottom, and an inner diameter of less than 38 mm (1.5 inches, the size of the balls) at the bottom. They are 14 mm high.
If you would like more information about the table, or have any information about it, then please mail Michael J. Cross.
Would it be possible to 3D print some replacement rings at a reasonable price? In the correct colours? If the price was right, I would probably want to obtain a full set for spares.
|
Ball and repaired ring from top, with measure: 
|
Ball and repaired ring from base, with measure: 
|
Way back in February this year (2020) I started learning how to use Tinkercad, and Fusion 360, and then tried to create a model of a ring. In 3D modelling terms, it seems fairly simple... just a ring. The complexity arises because of the way the inner surface is shaped, it isn't straight down, the ring is thinner at the top than at the bottom, and the curve is convex. Also, the outer edge isn't straight either, it tapers toward the base; that may not be crucial but probably DOES help prevent the ring falling down the hole.
I tried various ways, with different starting points, but none were satisfactory. I took what I had into the Hull Makerspace, together with the taped together white ring, and a white ball. The 3D printing expert didn't really look at any of my attempts, he just started from a blank page, created a cylinder, then merged it with part of a stretched-sphere shared hole. It looked fine in on-screen Tinkercad.
He transferred the stl file to one of the 3D printers via a USBstick I'd brought along, and set it printing. I sat & watched, fascinated, while he went away and helped other people. As the print reached the end, I realised that the top edge was crenellated! This surprised the guy too, when he returned! He said he'd not seen that effect before but thought he knew what had casued it.
I said I would try the new ring in the table, to see how it fitted & worked, adjust the model if necessary, and return in a 'few days'.
The STL file is Exquisite Robo-Rottis (31 kb).
I returned home with the new ring, and tried it in one of the empty holes... it fell straight through! I was hoping to have new rings that would fit, & stay, without using any glue, even though the original rings had all been glued, It may be that that is not possible. I wrapped some plasters round the ring until it fit more snugly, so I could try it in action. It did work, the balls went into the hole, and even 'buzzed' as they went in.
| Issue | Impact | Notes |
|---|---|---|
| Crenellation of the top edge | this IS ugly, even if it doesn't affect the functionality | |
| The inner and outer surfaces are layered, not smooth | Cosmetic? This IS ugly, even if it doesn't affect the functionality | Can this be improved by changing slicer or printing settings? Maybe painting would make them less obvious? |
| When the print had completed, there was some excess material left at the base of the ring, both inside and out | Only temporary. This is normal, and was easily broken off. Once that had been done the ball passed through the ring without catching | |
| The filament colour was black as that was what was loaded in the printer | Cosmetic | I was assured that it was easy to paint the object whatever colour I wanted |
| At the top of the ring, the internal curve was concave vertically, not convex | Despite this, the new ring did seem to work just like the old ones. | |
| The outer surface was straight rather than tapered | Does this really matter? |
At this point, I was more than a bit discouraged, and didn't do much immediately. Then Covid got worse, lockdown happened, and the Makerspace closed temporarily. It did re-open, but I haven't been back.
|
New, plaster-wrapped, 3D-printed ring, and old ring: 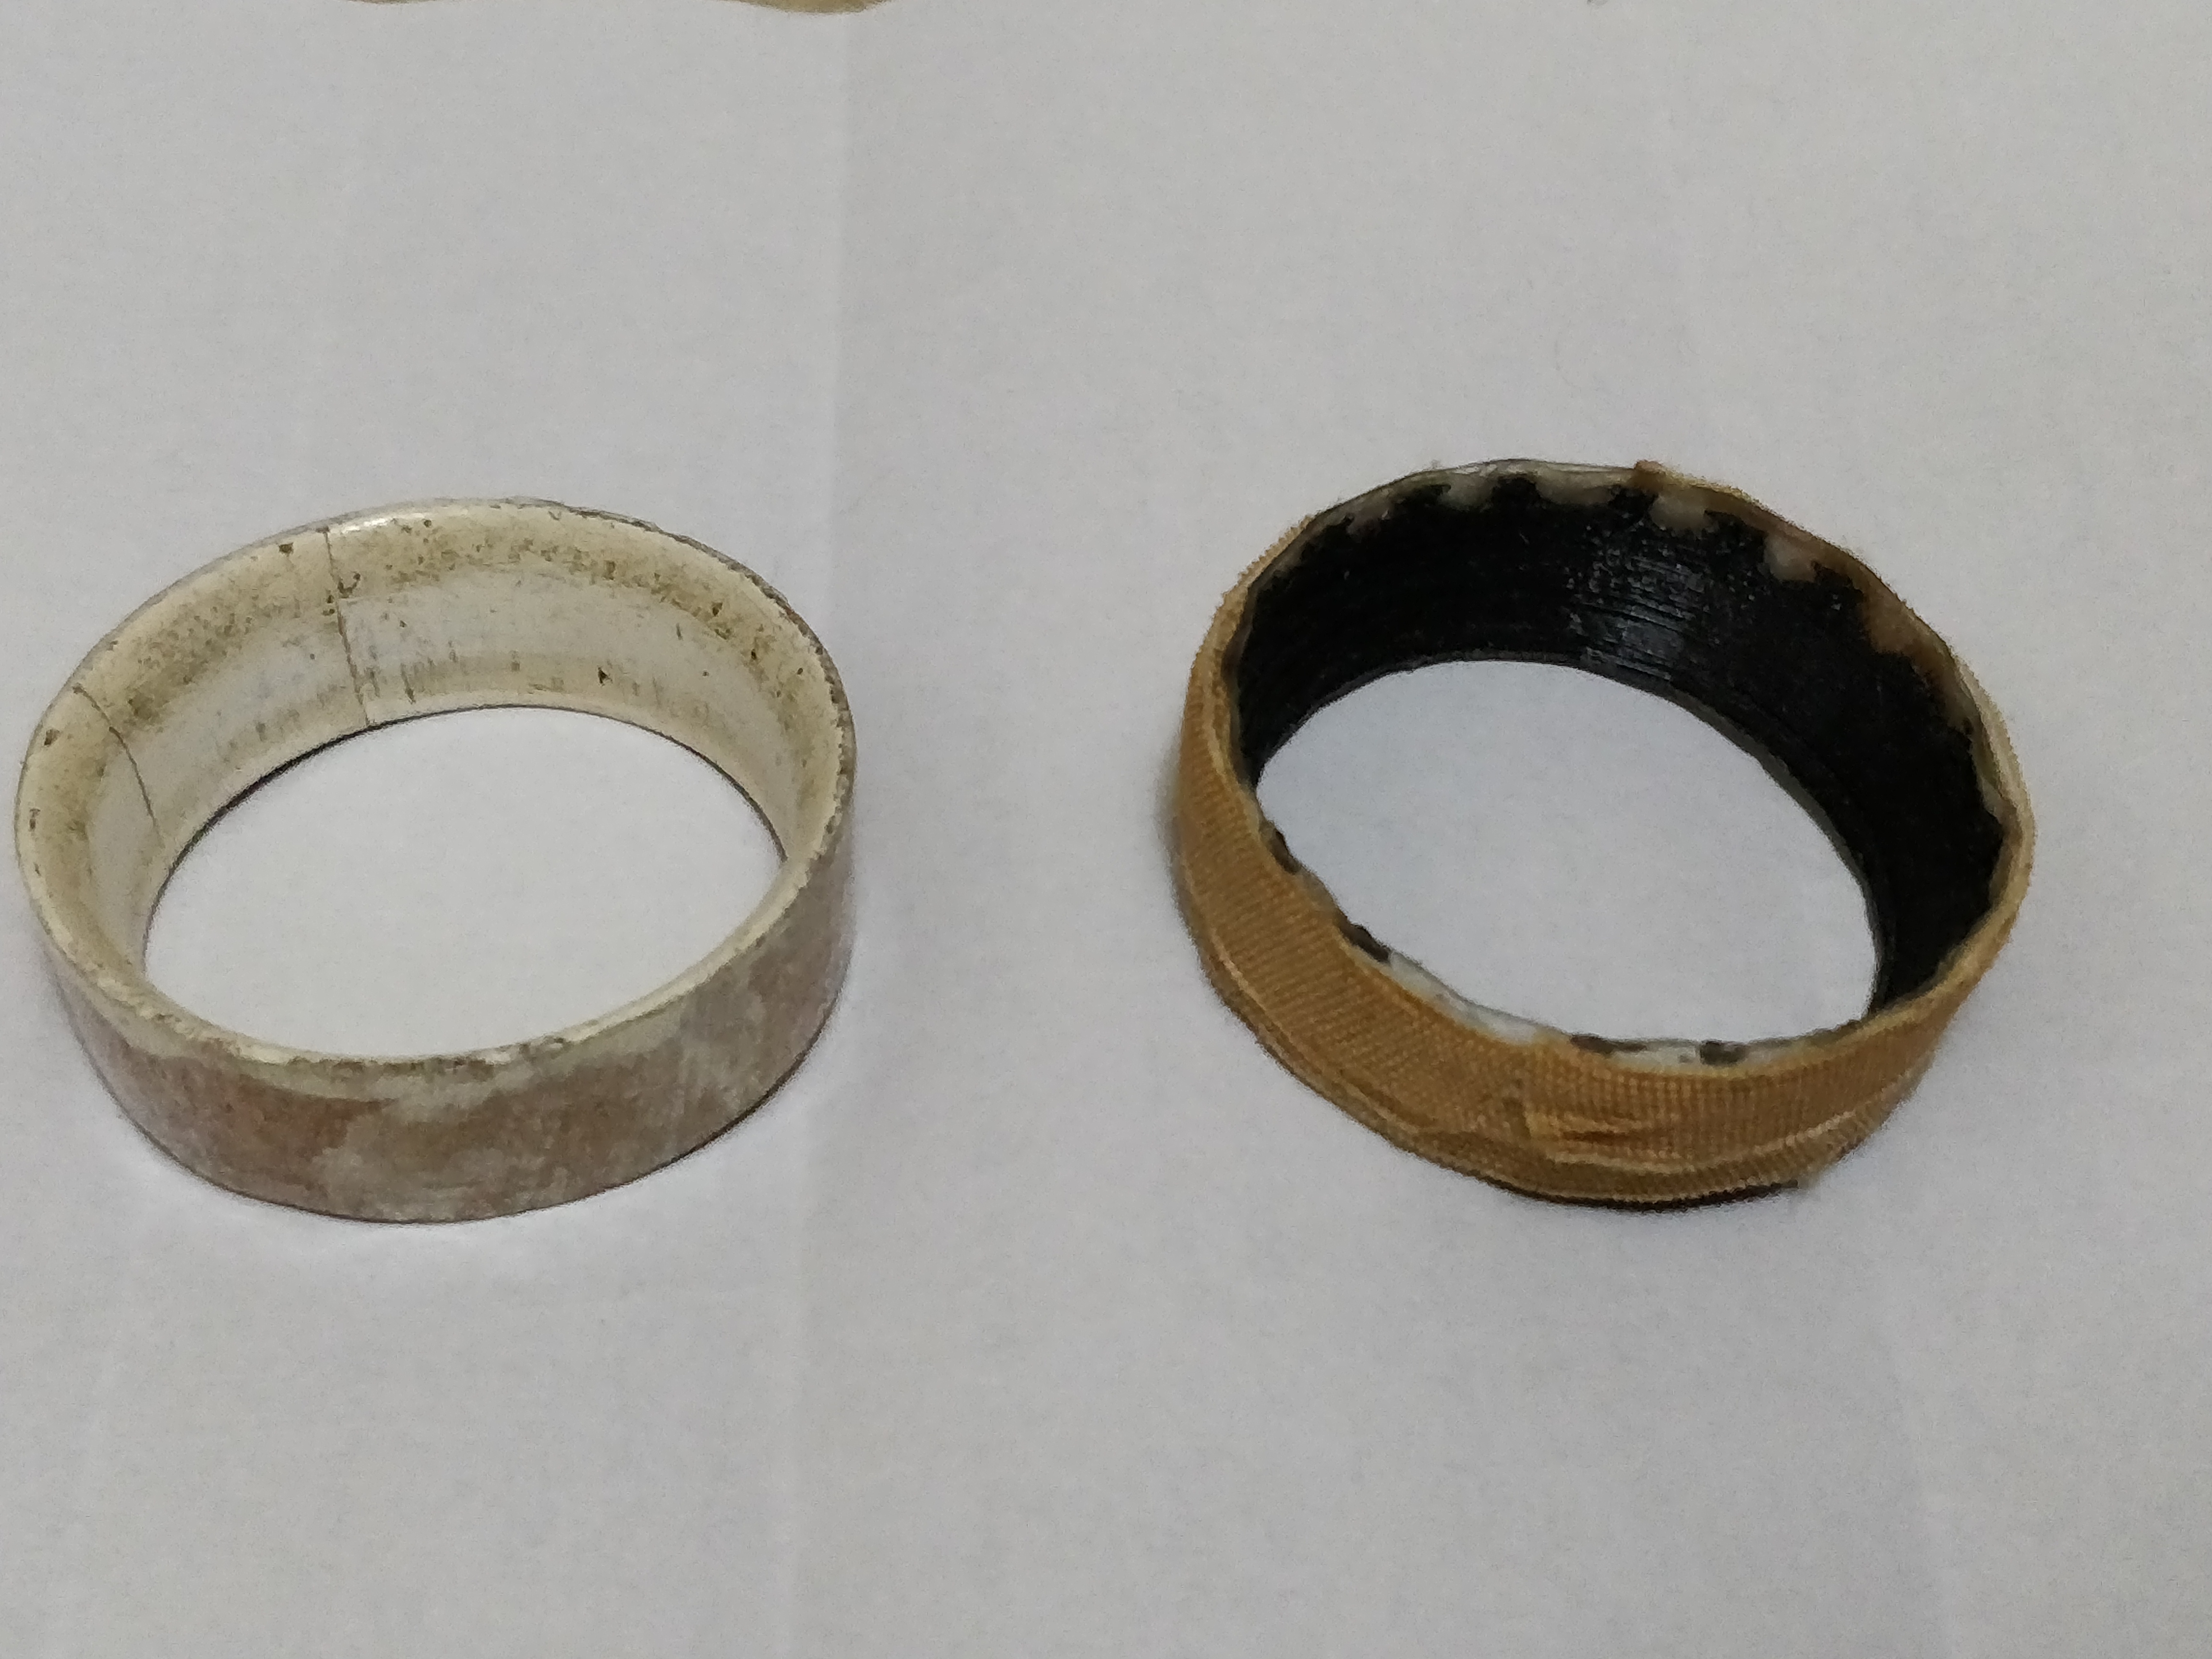
|
I've been using the table every day, on my own, without the new ring in place. The different noises (the lack of 'buzz', and a louder bang as it hits the floor of the tray) when a ball falls down the empty 10 hole remind me that I want to have another go at the modelling. The Makerspace HAS re-opened, albeit under a different way of working.
Someone emailed me yesterday if I had had any success, and that has prompted to post this update, and to seriously think about the modelling again.
The ring needs to be bigger, to make it fit better in the holes. Keeping the same internal size while doing this would increase the thickness of the ring itself. Would this get rid of the crenellations?
Would it be worth starting again, from a more complex object, eg a wedding ring (if I could find a model online) which could give the right shape if chopped in half through the material, leaving the inner half and then horizontally too?
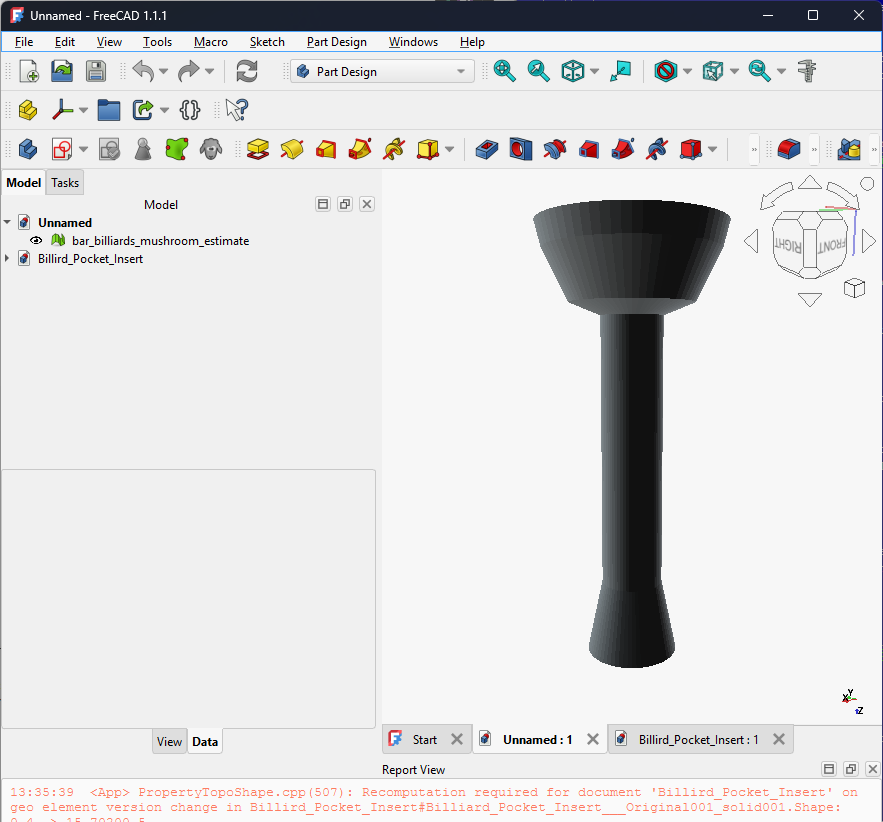
Thanks to Sav on the Bar Billiards forum, I now have the STL file that was used to create rings for full-size tables - Billiard Pocket Insert (1.8 Mb). The upper inside is curved in the same way as the rings I have. The outer surface is tapered, but looks dramatically different to the ones I have, as it is ribbed.
|
Full-size ring in Tinkercad: 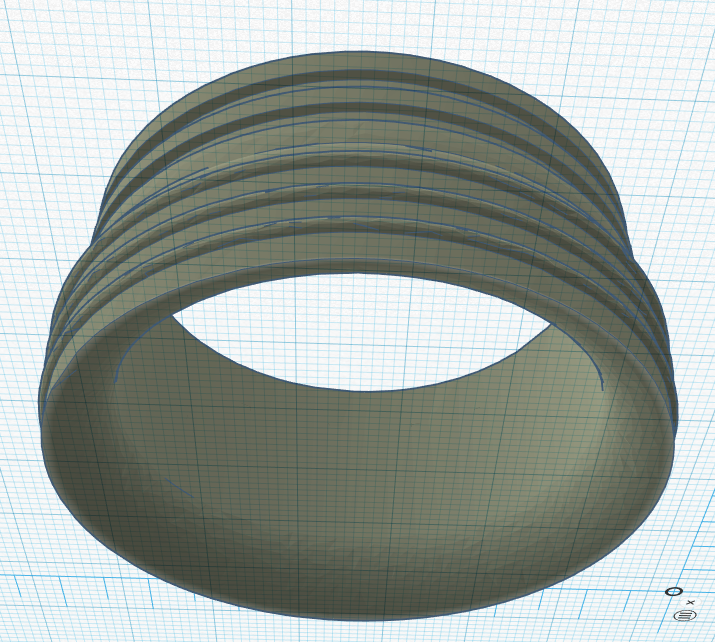 |
I'm going to try to scale the full-sized ring down to fit the holes in my table, and get one printed.